Setting up Apollo SSO with Azure AD
⚠️ Single sign-on (SSO) is available only for Enterprise plans. Unlike most Enterprise features, this feature is not available as part of an Enterprise trial.
This guide walks through configuring Azure Active Directory (Azure AD) as your Apollo organization's identity provider (IdP) for single sign-on (SSO).
These steps use PingOne's email invite method, because in some cases Apollo's default entity ID (PingConnect) might already be used by another application in your organization.
1. Create an Azure AD app registration
-
Go to your Azure Portal and then navigate to Azure Active Directory.
-
In the left pane, select App Registrations. Then in the top ribbon click + New Registration.
-
On the Register an application page, provide the following information:
- Provide a friendly name for the PingOne client (such as
Apollo GraphOSorPingOneConnect). - Under Supported account types, select which Microsoft account types will have access.
- Leave Redirect URI empty. You'll provide this information later.
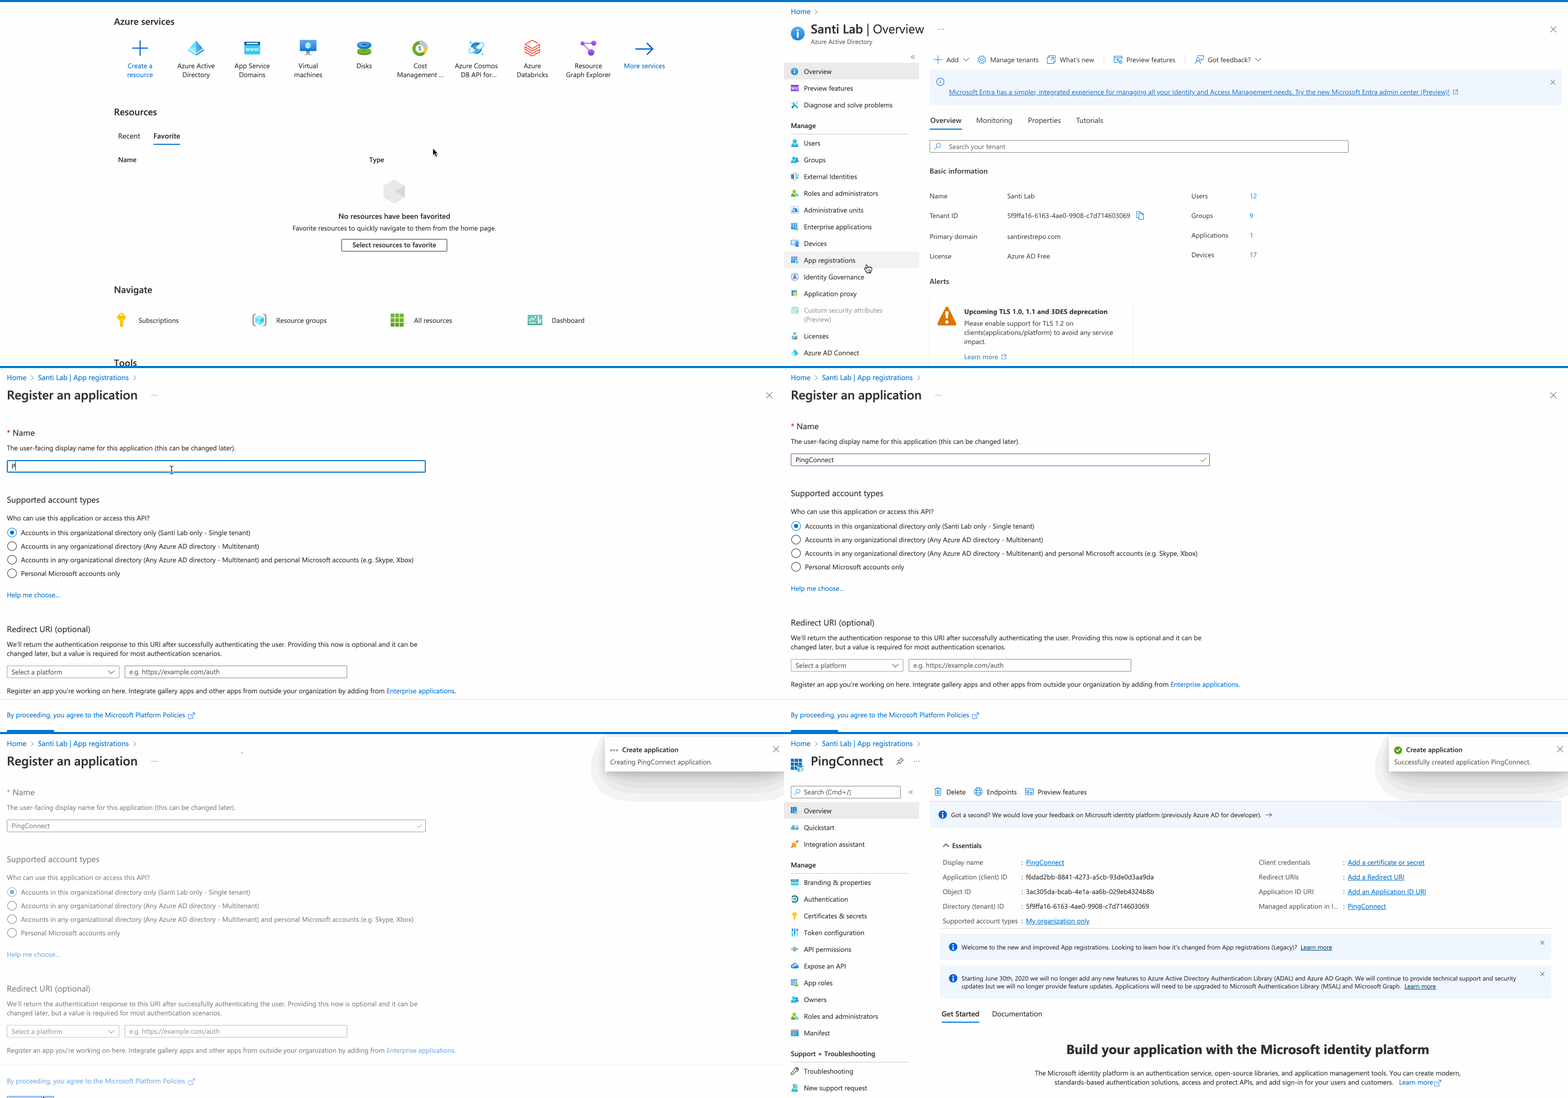
Then click Register.
- Provide a friendly name for the PingOne client (such as
2. Retrieve your endpoint URL and client ID
-
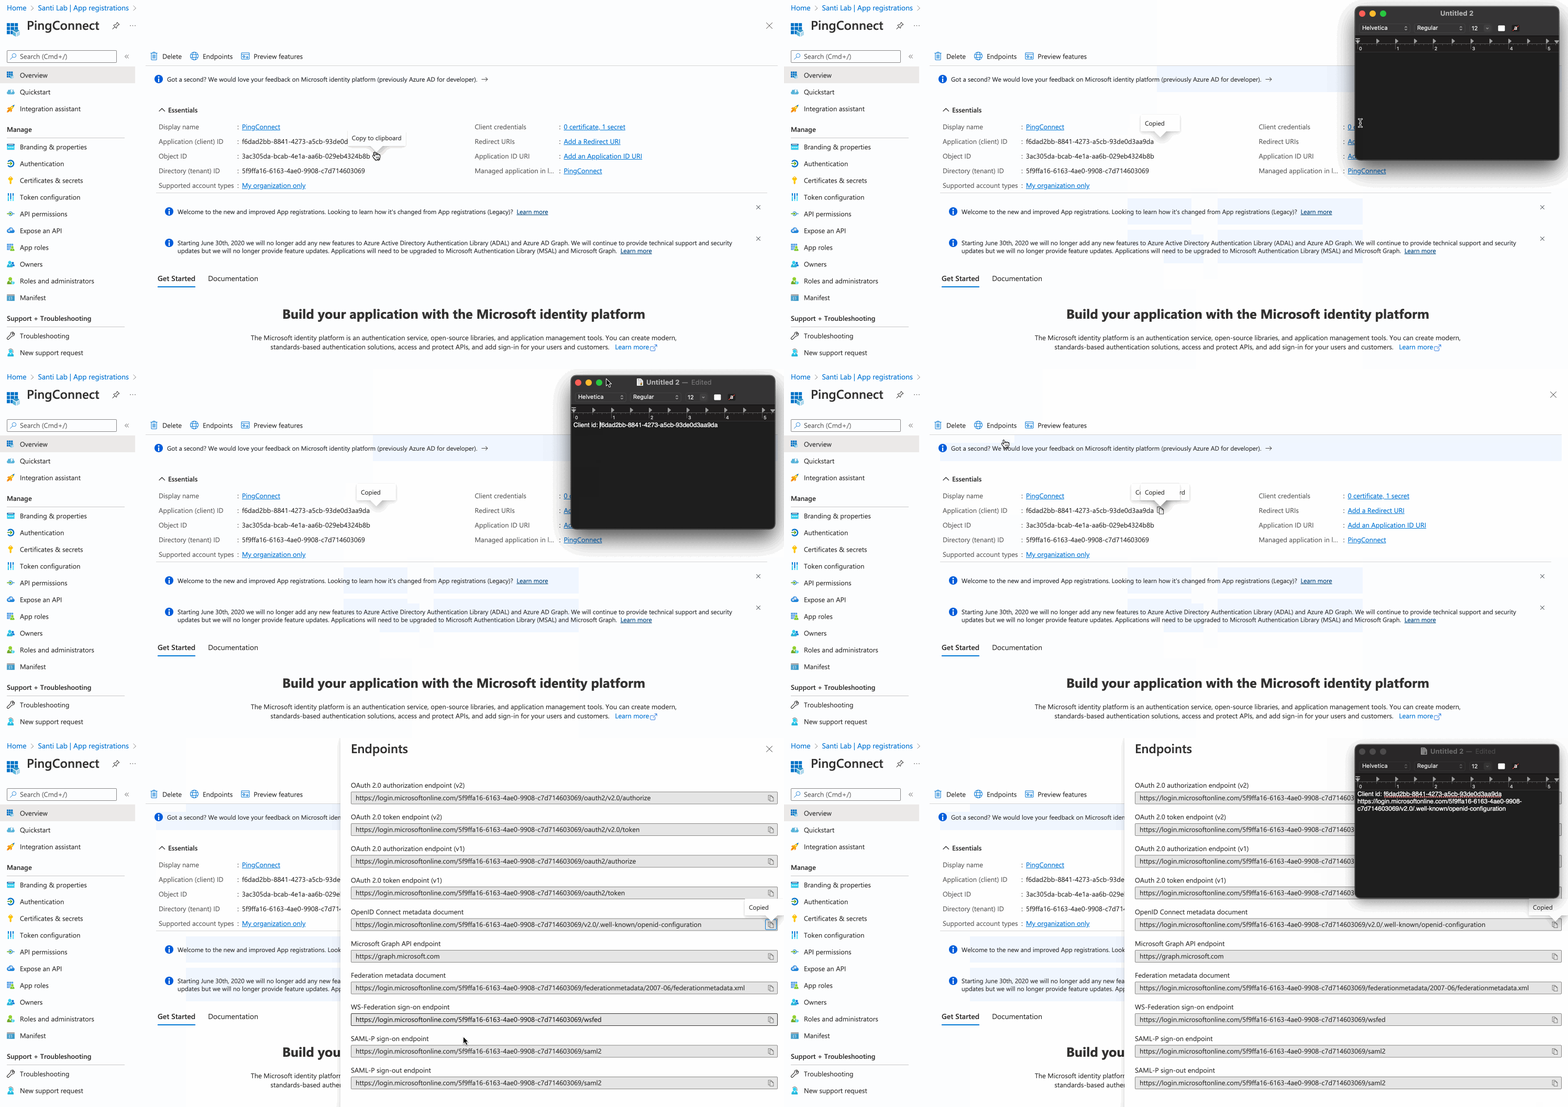
From the Overview section of your newly created app registration, copy and paste your Application (client) ID into a local text file.
-
Still in the Overview section, select Endpoints from the top menu.
-
Copy and paste the OpenID Connect metadata document URL into the same local text file:
3. Create a client secret
-
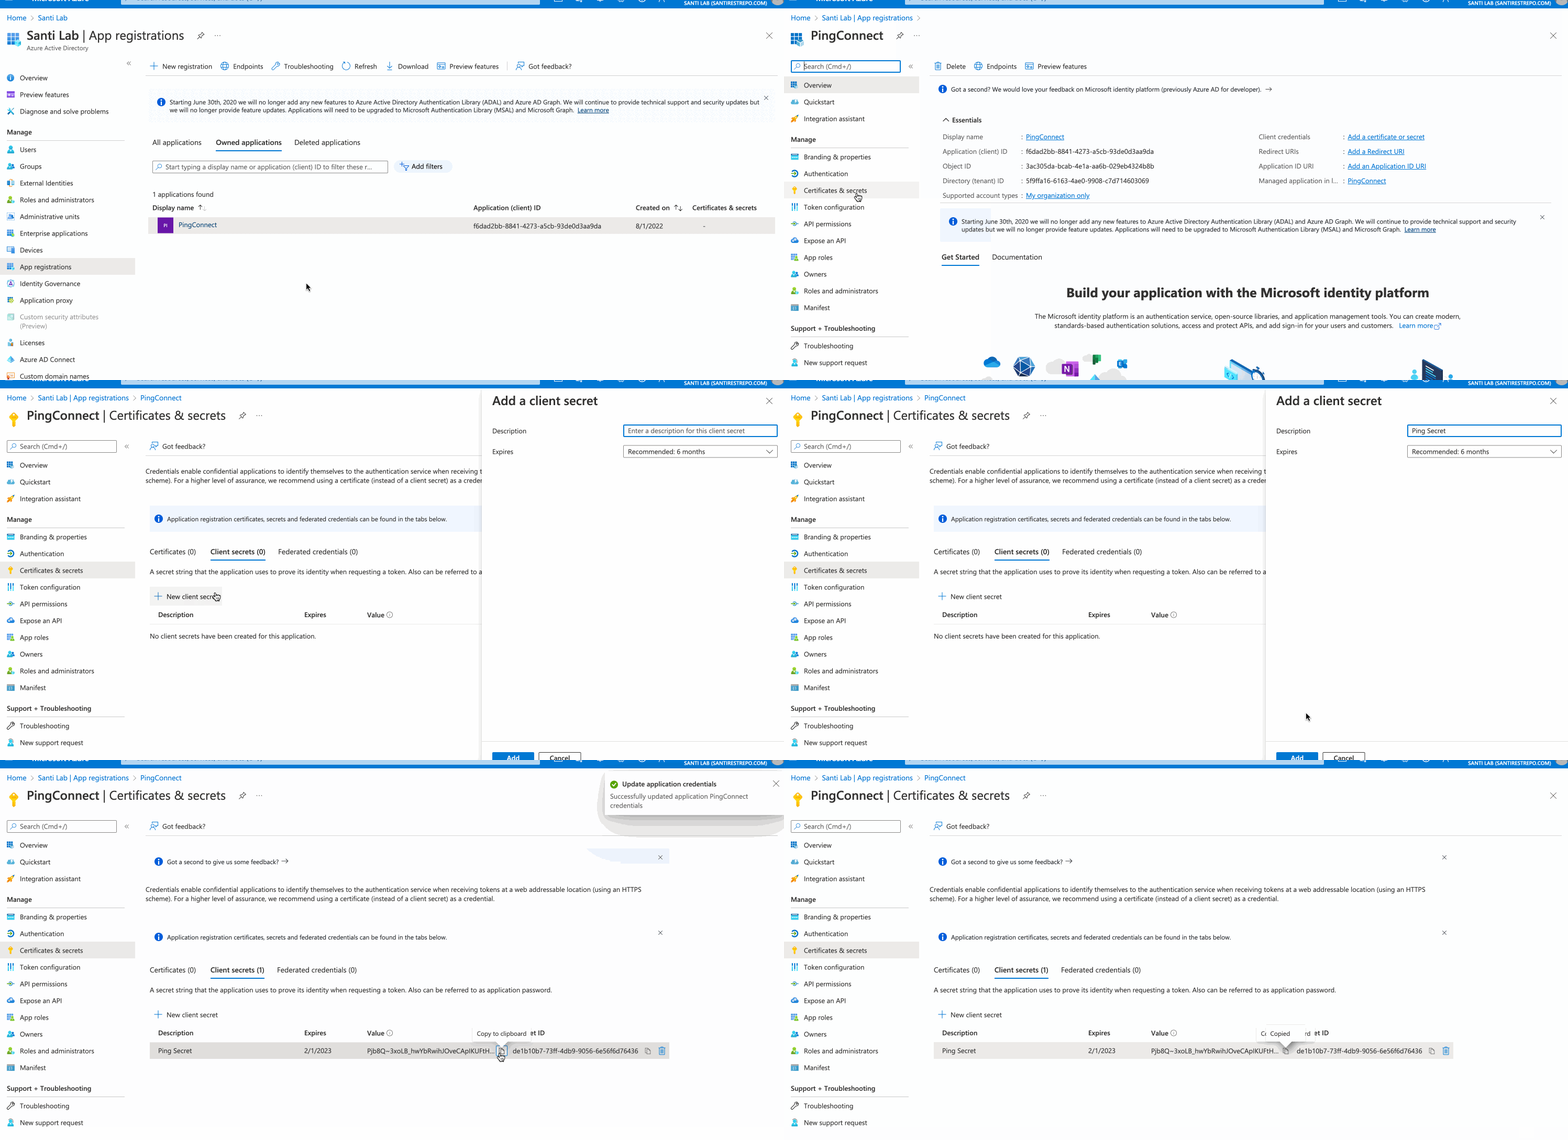
From the Certificates & secrets section of your app registration, click + New client secret and create a new secret.
-
Copy and paste the secret's Value field to the same text file you created earlier:
4. Configure API permissions
-
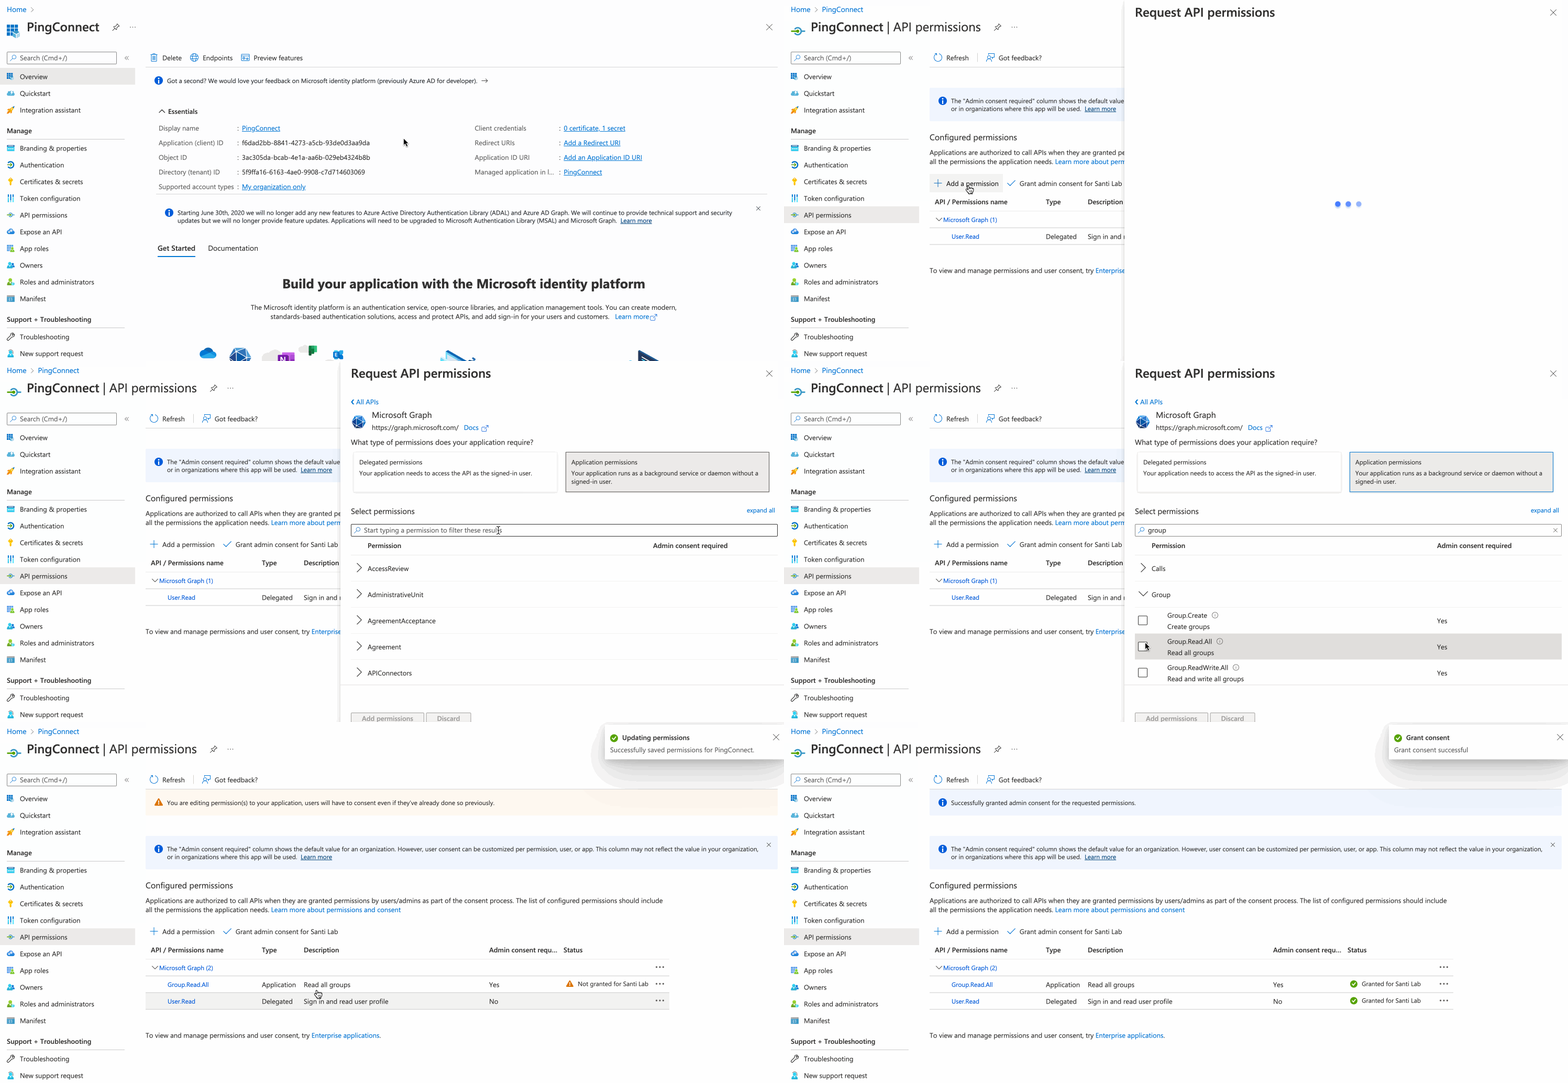
From the API permissions section of your app registration, check whether
User.Readis listed by default. If isn't, add it manually:- Select + Add a permission > Microsoft Graph > Application permissions.
- Search for
Group, expand, and select Group.Read.All. - Save your changes.
- If
User.Readwas not auto created, repeat this process forUser.Read.
-
Also from the API Permissions section, select Grant admin consent next to the + Add a permission button. Doing this ensures that your users don't need to grant consent during SSO.
-
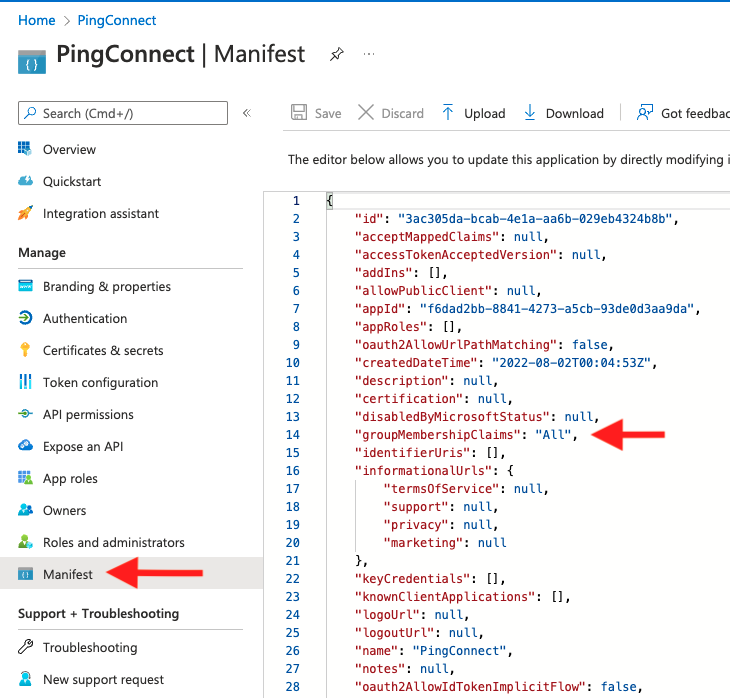
From the Manifest section of your app registration, find the
groupMembershipClaimsproperty. Change its value fromnullto eitherAllorSecurityGroup.- This ensures that the group membership claim is included in the access token during SSO.
-
Save your changes.
5. Integrate PingOne with Azure AD
-
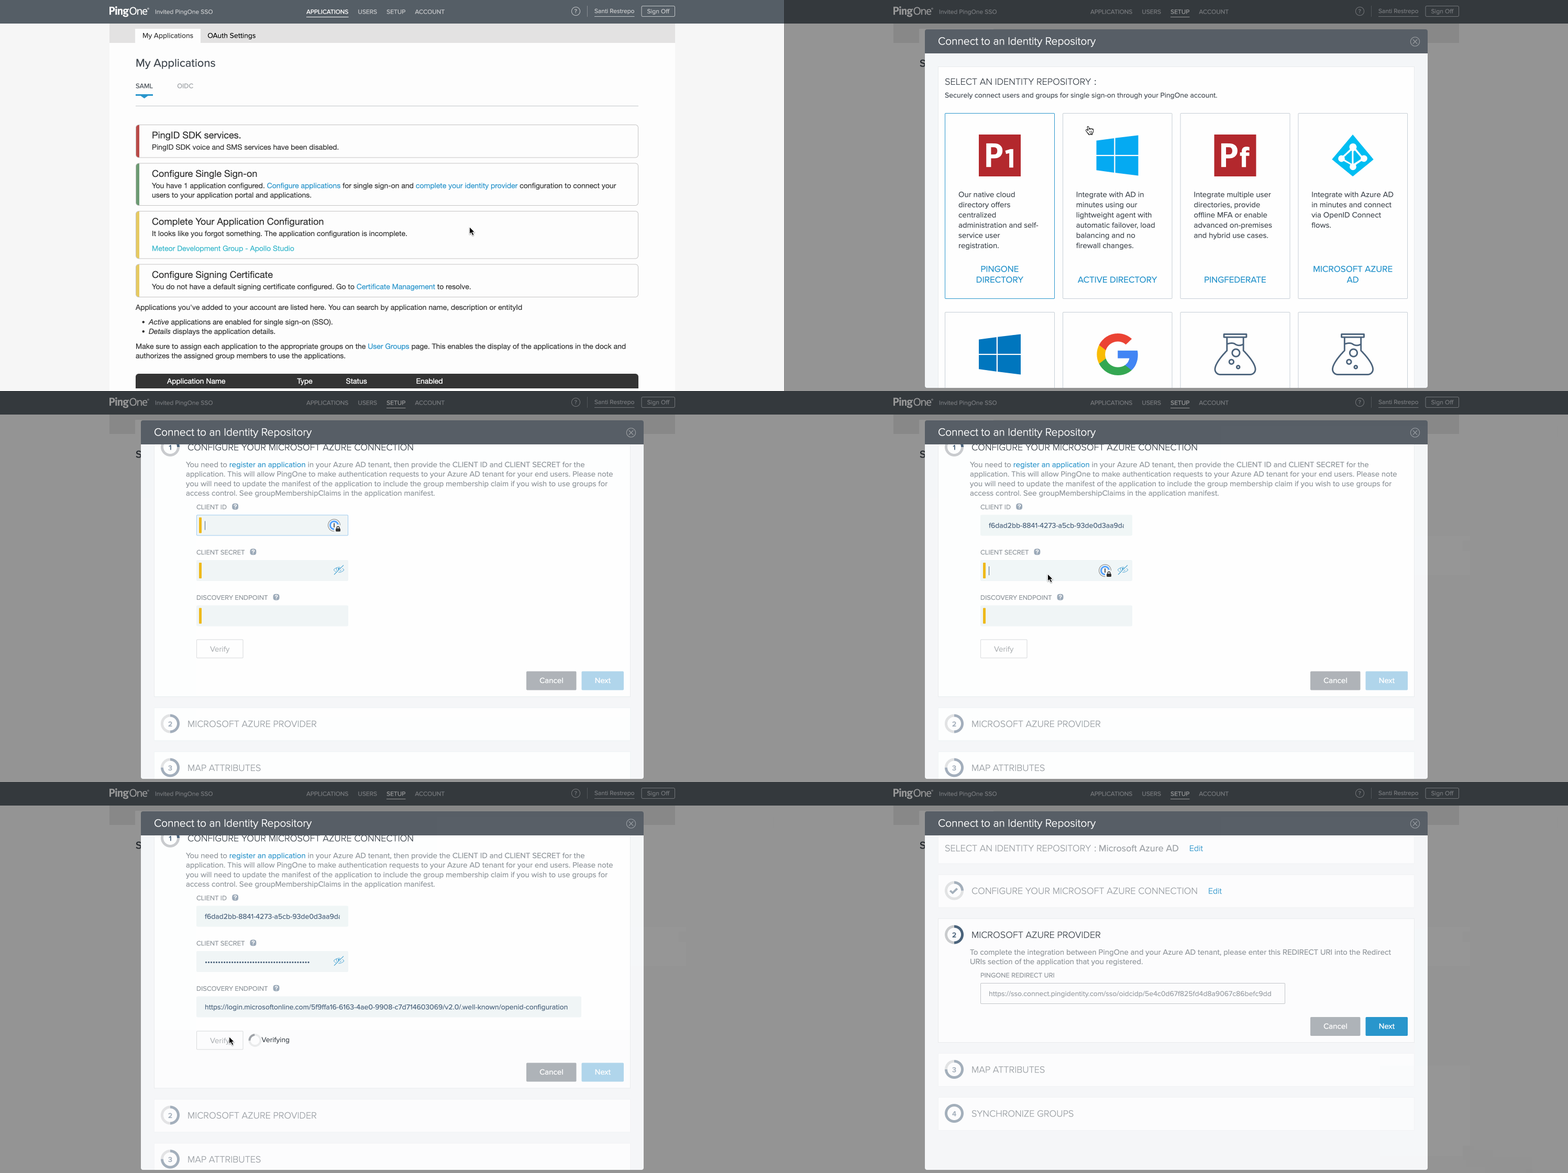
After you receive your PingOne SSO invitation email, click the enrollment link to create a new account or sign in with an existing account.
-
On the landing page, click Setup on the top ribbon.
-
Select Connect to an Identity Repository > Microsoft Azure AD and click Next.
-
From the Configure Your Microsoft Azure Connection modal:
- Copy and paste the endpoint URL, client ID, and client secret values saved earlier from Azure AD.
- Select Verify. PingOne will verify that it can query the endpoint(s) you've specified.
- For Scope, select the OAuth scopes to include in authentication requests.
- Click Next.
-
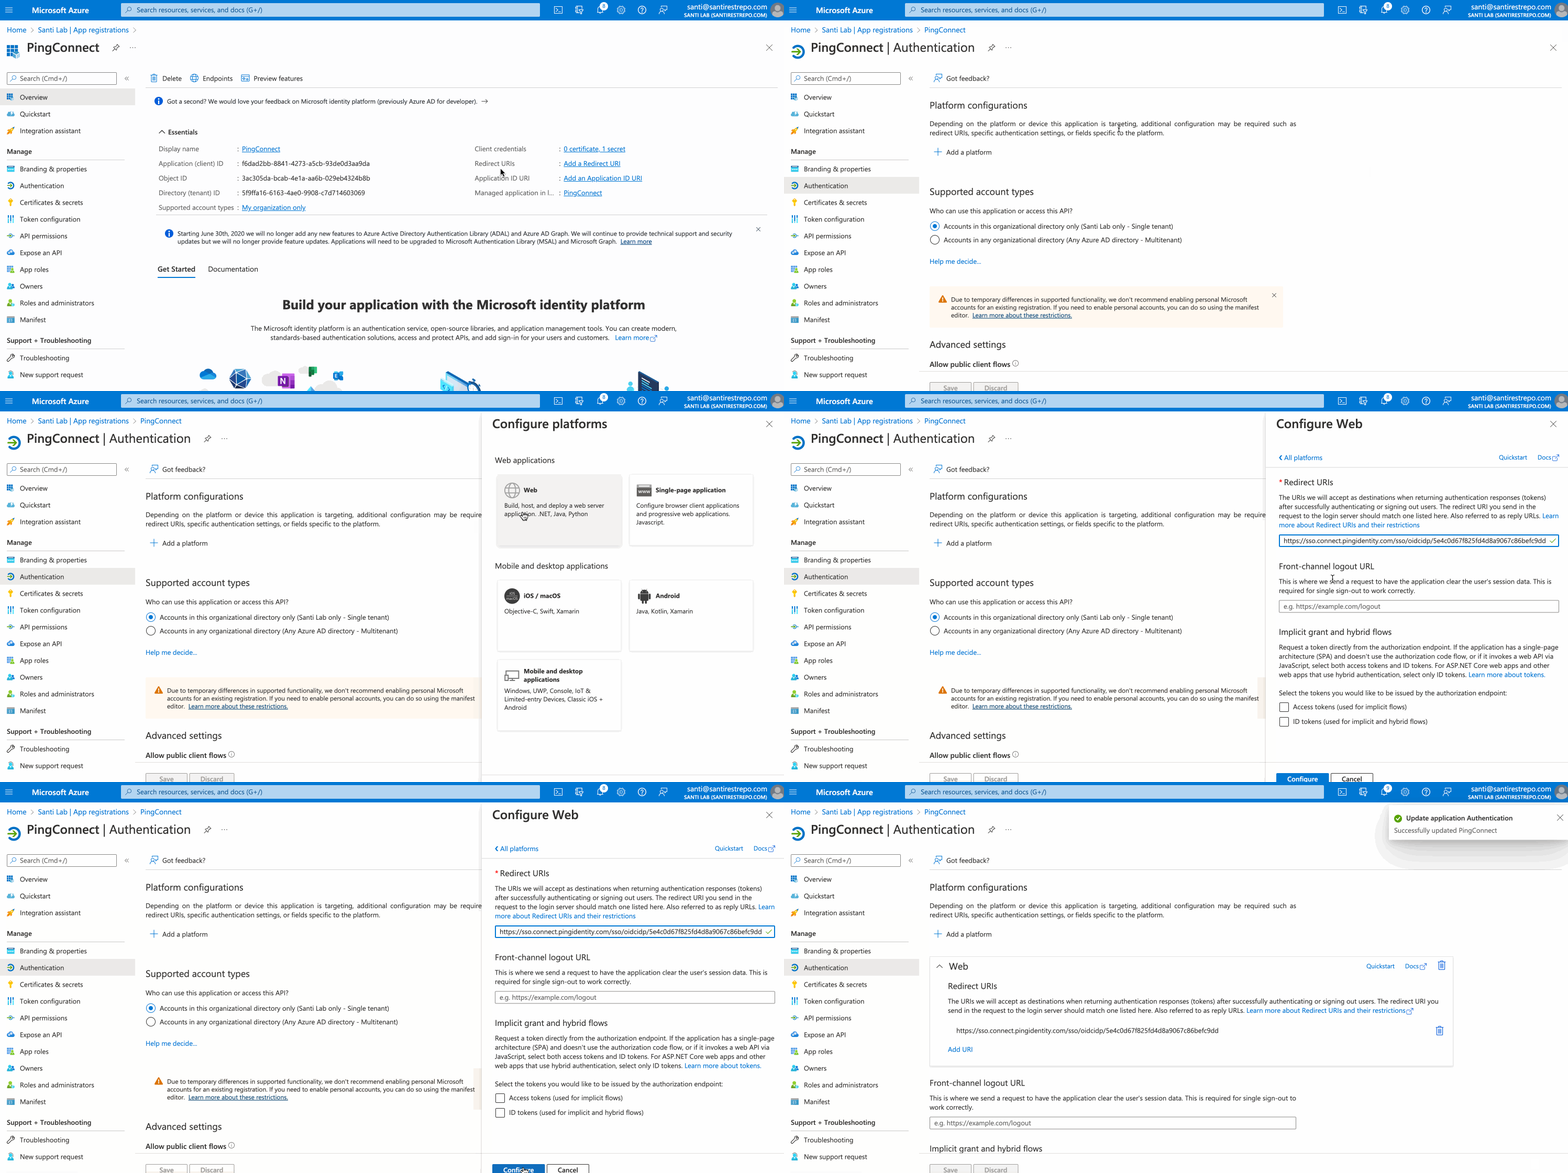
In Step 2 of the wizard, copy the PingOne Redirect URI and paste it on the Azure AD app registration.
- Redirect URIs can be configured from the Overview section of your app registration under the Essentials menu in Azure AD.
- Select Redirect URIs > Add a platform > Web and enter the Redirect URI you copied from PingOne. Select Configure to save changes.
- Back on the PingOne configuration wizard, select Next after copying and pasting the URI.
-
In Step 3 of the wizard, configure the Map Attributes section by mapping the incoming attributes or claims from Azure AD to PingOne. You can leave this with the default Attribute Mapping.
-
In Step 4 of the wizard, choose whether or not to synchronize your user groups from Azure AD to your PingOne user groups.
- The permissions User.Read and Group.Read.All are required for synchronization to be successful.
- Any PingOne user groups that do not exist in your Azure provider will be replaced by the Azure groups.
- Each of your Azure group members are automatically added to the corresponding PingOne groups when the user initially signs on (SSO) to PingOne. This is PingOne's just-in-time user provisioning.
-
Click Save to finish connecting Azure AD to PingOne.
6. Configure the OIDC Application
After you successfully configure the identity bridge between Azure AD and PingOne, you need to configure and enable Apollo as an OIDC application. The configuration for this application should already be initialized, and you can access it via the Complete your Application Configuration reminder under Applications in the PingOne admin console.
-
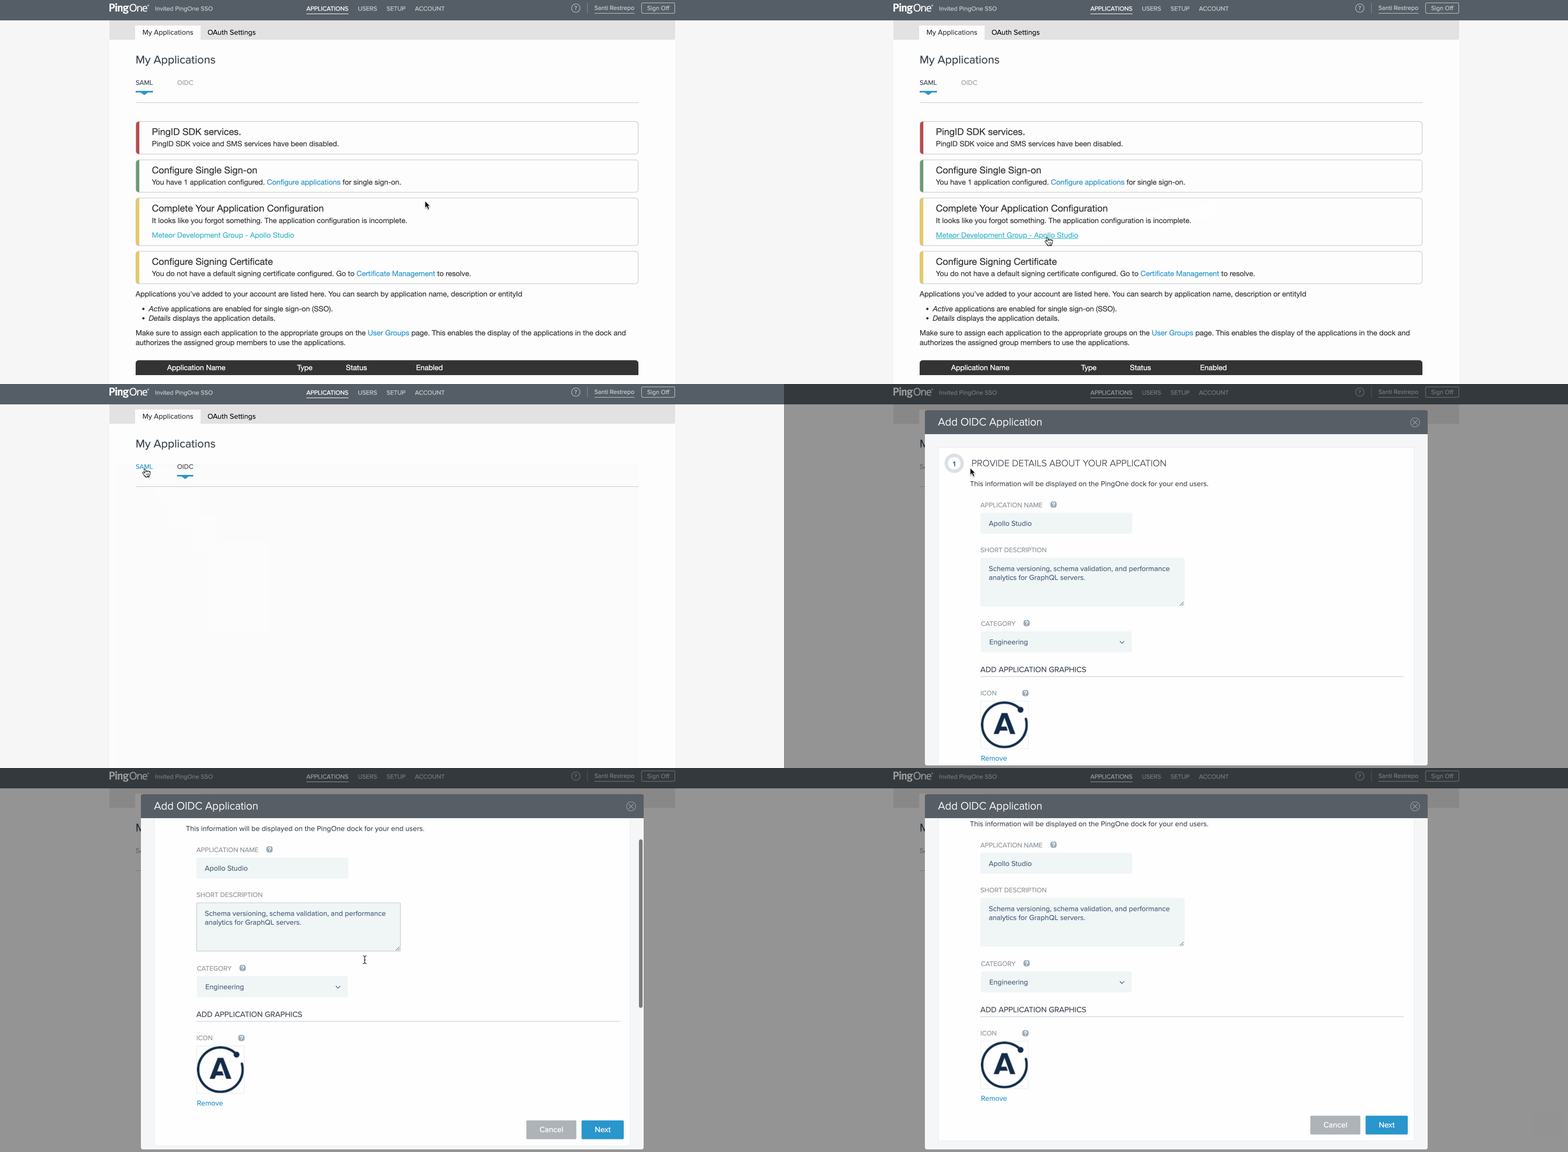
Select Meteor Development Group - Apollo Studio under Complete your Application Configuration.
⚠️ If the Add OIDC Application wizard doesn’t automatically pop-up, select the SAML tab and then select the OIDC tab.
-
In Step 1 of the Add OIDC Application wizard, configure the application name, description, category, and icon (optional).
-
Click Next for Steps 2-5 (these are configured by default).
-
In Step 6 of the wizard (Attribute Mapping), you must map
emailtoemailandsubtopreferred_username. You can optionally map more attributes for given name, family name, and others. -
In Step 7 of the wizard (Group Access), select whichever groups should receive SSO access to Apollo.
-
Click Done to complete the configuration.
7. Notify Apollo
After you complete the steps above, reach out to your Apollo contact. They will complete your SSO setup.